 |
This guide will provide a brief introduction to ScriptVOX Studio. It will
provide an overview of the essential controls and functionality of the program.
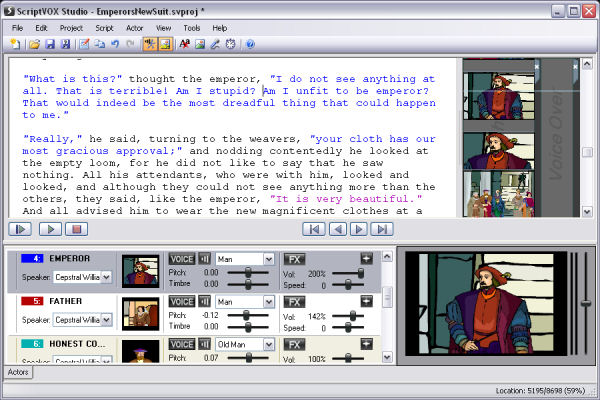
When you first start ScriptVOX Studio, a sample project will load into view. You
should now see the text of the script in the top panel and a list of actors in the
bottom panel. To the right of the text panel is Media Track which allows you to
add graphics to the script. To the right of the actor panel is the Graphical Viewer
which displays the images as the script is played.
|
 |

|
|
|
Text View
|
|
The top text panel (#1) is called the Text View. It provides a textual overview of the
story or script. The Text View also provides an interface for editing the story
in a controlled manner by adding, removing or modifying each element. It allows
you to navigate through the story or search for specific lines of text.
|
|
Actor View
|
|
The bottom tabbed panel (#3) is the Actor View. The Actor View has a list of actors
or characters in the script. These actors are associated with one or more lines
of text in the Text View. This panel provides an easy way to modify speech and voice characteristics of an actor. You can modify the pitch, timbre, volume and speed of each actor as well as add special effects to the voice.
|
|
Playing the Script and Navigation
|
To play the script, click on the "Play All" button on the far left, below the Text
View. This will start the playback of the script. You should hear the text in the
story being spoken and see the images appear in the Graphic Viewer. The Text View
will also highlight in yellow and scroll to keep the spoken text in view.
You can stop
the playback by clicking on the "Pause" or "Stop" buttons. To continue
at the same location in the text you can click on the "Play from selection" button.
To navigate forward and backward in the script, use the "Navigate Forward" and "Navigate
Backward" buttons which are located to the right of the Play and Stop buttons. You
can also use the "Go to Beginning" and "Go to End" buttons to quickly go to the
beginning or end of the script.
|
|
Rendering to a Media File
|
|
ScriptVOX Studio can render to WAV, OGG, WMA, WMV formats. To render the sample project
to one of these media types, click on the "File>Create Multimedia File.."
menu. This will bring
up a "Save Project to Media File" dialog. You can choose the type of file to save
to from the "Save as type" list.
|
|
 |
|
Click to Go Back
|
 |