 |
ScriptVOX Studio provides tools for assigning an actor to a specific selection of
text in a story. This allows you to easily format the
spoken dialogue within a script where each actor can be assigned any number of lines.
The playback of the story will automatically change the voices as the text is spoken,
providing you with an
excellent overview of the dialogue flow.
ScriptVOX has a fully-functional text editor that allows you to modify the
story with regards to text content, font, style, and formatting. It supports clipboard
functionality such as cut, copy and paste. The editor also supports
multi-step undo and redo.
In addition, ScriptVOX Studio has a robust pronunciation tool, allowing you do modify
how any word or phrase is spoken. You can sculpt the sound of the spoken text with
basic word substitution and detailed
phoneme modification.
|
|
|
Actor Assignment
|
|
Assigning Actors to Text
|
|
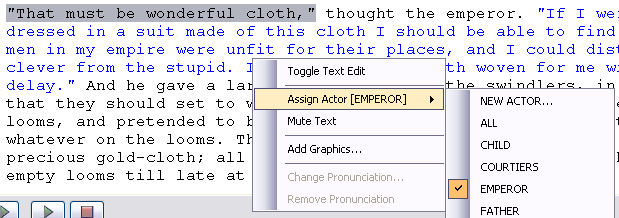
You can conveniently assign actors to text by selecting the text in the Text View
by left-clicking
with your mouse. The highlighted text can now be assigned to a specific actor by
right-clicking the selection and choosing the "Assign Actor" menu item.
|
|
Choosing an actor, in this case the "Emperor", should turn the selected text to
the actor's color indicating that that text is now associated with the "Emperor"
actor.
Within the "Assign Actor" menu, you have a choice of creating an actor (choose "NEW
ACTOR.." menu) which then will automatically create and assign a new actor to the selected text.
Or you can choose an existing actor and make that assignment to the selected text.
After you have assigned an actor to a piece of text, ScriptVOX will automatically
change the voice of the spoken text to the actor which you have specified.
|
|
|
Muting or Unmuting Text
|
|
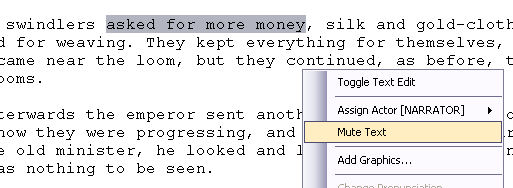
You can tell ScriptVOX to not speak a selection of text during playback or rendering.
Simply select the text in the Text View and right-click the highlighted text. Choose
"Mute Selection" from the context menu.
|
|
|
This will change the background color of the text to red. From now on, ScriptVOX
will skip that text during playback or rendering of the script. You can unmute
the text by right-clicking on the text and choosing the "Unmute" menu item from
the context menu.
|

|
|
|
Adding Pauses
|
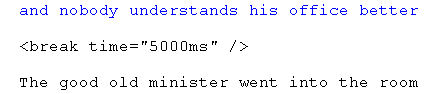
You can add pauses to the text to control pacing of the speech. This gives you control
over the timing down to 1 millisecond. To add a pause, choose a place in the Text
View by left-clicking your mouse once and click on the "Script>Add Pause.."
menu item.
This will add a "Break" text element with a specific delay time. You can manually
change time as needed to control the delay by using the basic editing functionality
of the Text View. The time value can vary between 0.1 to 60 seconds (100 to 60,000
milliseconds).
|
|
|
|
Changing Pronunciation
|
At times, the Text-To-Speech engine may need suggestions for better pronunciation
of words. If you would like to change pronunciation, first select a word and then
choose the "Script-Change Pronunciation.." menu item.
This will give you the option of controlling the audio output of the word with regards
to phonetics or word substitution. You can also set general rules for changing pronunciation.
See the separate section on Pronunciation Tools.
|
|
|
In-Line Text
Editing
|
|
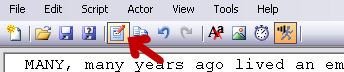
To edit the text, simply click on the "Toggle Text Edit" menu item or click on the
"Toggle Text Edit" toolbar button. This will put the Text View into edit mode, allowing
you to freely change the text within the Text View.
|
|
|
|
Text Editor Toolbar
|
|
After you have toggled the text edit mode on. The user interface will contain
an additional text editor toolbar. See details below.
|

|
|
Font Selector
|
|
Chose the font you would like to use in your story. Changes in this control
affect all of the text.
|
|
Font Size Selector
|
|
Choose the font size for your story. Changes in this control affect all of
the text.
|
|
Font Style Buttons
|
|
Change the font style of selected text to Bold, Italics or Underline style attributes.
Or you can click on the "Clear Formatting" button to remove any style attributes
from the selected text.
|
|
Text Alignment Buttons
|
|
Choose the text alignment of the selected text. Selected text can be Left-Justified,
Centered or Right-Justified.
|
|
Margin Size Controls
|
|
Adjust the size of the left and right margins of the selected text.
|
|
|
|
Rich Text Control
|
|
The Text View can act like a full text editor. You choose where to type by clicking
on the control with the mouse. You can select text by holding down the left mouse
button as you drag over text. Typing on the keyboard lets you add or remove characters.
You can also use standard select, cut, copy, and paste commands to edit text.
|
|
Font Family and Size
|
The Set Font drop down list allows you to select the font family such as "Times
New Roman" or "Courier New". Click on the control and select a font name from the
list. Once you have selected the font name in the list with your mouse, the font
in the Text View will change immediately.
The Set Font Size drop down list provides the ability to change the font size of
the Text View. Click on the control and select a font size and it will immediately
change the size of the font within the Text View. You can also choose to type in
a custom size in the control.
|
|
Font Style
|
|
To change the font style, select a portion of text in the Text View with the mouse.
Click on the "B", "I" and "U" buttons to add Bold, Italics and Underline to the
selected text. You can click on the Clear Formatting button to remove any style
formatting from selected text.
|
|
Text Alignment
|
|
To change alignment of selected text, click on the Left-Justified, Center, and Right-Justified
buttons. This will change the alignment of the selection only, not the entire text.
|
|
Text Margins
|
|
To change the left margin of selected text, click on the Increase Indent or Decrease
Indent buttons. You can also change the left margin by typing in a specific value
(in inches) into the left margin text box. You can change the right margin by typing
in the specific value (in inches) into the right margin text box.
|
|
Cut, Copy and Paste
|
|
You have full control over cut, copy and paste. Cut allows you to remove large segments
of text out of the Text View and stores that text on the system clipboard. Copy
leaves text alone and copies the selected text into the clipboard. Paste lets you
insert text from the clipboard into the Text View.
|
|
|
|
Click to Go Back
|
|